This post contains affiliate links. If you buy through these links, I may earn a small commission.
Here are our best tips for how to plant garlic cloves in your vegetable garden!
Garlic is one of the easiest vegetables to grow in your garden or in containers. And it is wonderful to use in all kinds of cooking recipes, plus it’s also very healthy for us.
Garlic doesn’t take up much room at all so you can either plant a bed of garlic cloves in a corner of your garden or tuck a dozen garlic plants in a pot and keep it on your deck.

You can see we love to grow and harvest garlic! And because we live in a northern climate (Zone 3 Canada) we only grow a type of garlic called hardneck.
Hardneck garlic is a garlic variety that loves a cold winter; if you are in warm winter areas, grow softneck garlic instead, as softneck varieties are better in warmer climates.
How to Plant Garlic in the Fall
In our climate (cold winters) we plant our Garlic in the early Fall anywhere from around mid-September through to the middle of October. If you live in the South you plant in the early Spring.
Generally, you’ll want to avoid planting garlic where other garlic, onion, or any other member of the allium family has been planted recently.
This also includes plants like leeks, scallions, shallots, and chives. Rotating where garlic or other related plants are grown can help avoid allium pests or diseases.
Keep reading to see just how easy Garlic is to grow and then make sure you plant a few cloves!
How to Grow Garlic in a Raised Bed

We plant garlic in our vegetable garden beds or in raised beds next door where we have lots of room. Add some good quality compost or well aged manure, blood meal, or fertilizer and dig it in well.
Rake the soil smooth and get ready for planting garlic cloves.
Planting Garlic Cloves
Here’s our Garlic Bed, ready for planting. We plant Garlic close together – you can see I have 4 beds separated by narrow walkways.
I take my box of keeper cloves (here’s how we decide which cloves to eat and which garlic cloves to use for planting) down to the garden.
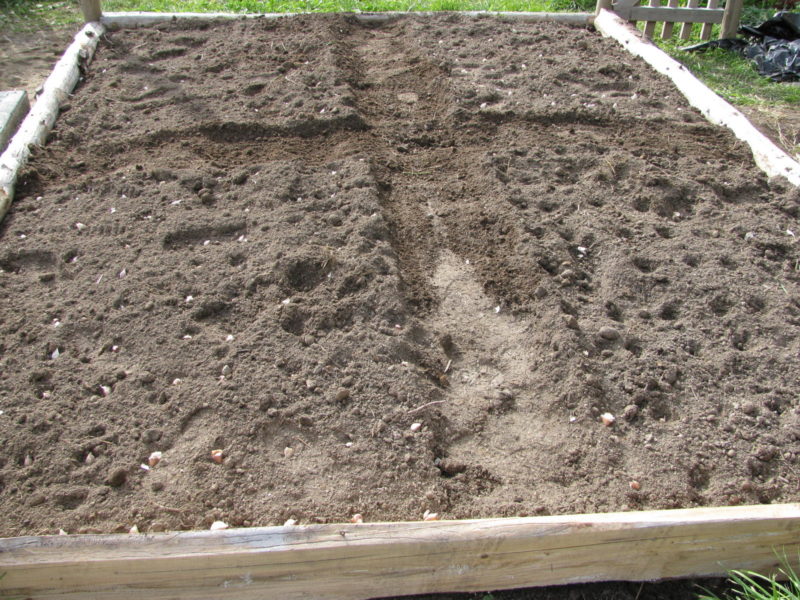
I plant the garlic cloves about 6 inches apart, with 8 inches between the rows. This ensures the garlic will get enough direct sunlight. Then, I push each of the cloves about 3 inches of depth below the soil surface.
You can see the individual cloves in the picture above because I like to try and get the rows nice and straight, so I don’t push them down to seat them and put the soil on top of them until I am finished planting them all. I use the planted ones as markers for the rest of the cloves.
I was able to plant 288 cloves in that space! You can see it doesn’t take a lot of room to grow enough garlic for your family for the winter months.
Our 288 cloves is a LOT of garlic, but we love roasted garlic and we often have 2 whole heads of garlic between us at dinner time.
We also love making Bacon Wrapped Garlic Bites – so yummy as an appetizer!
If you cook the garlic, it is a lot milder than if you eat it raw and it’s so healthy for you! Lots of nutrients and flavor emerge when cooking.

How to Plant Garlic in Pots
If you don’t have room for a vegetable garden, you can easily plant garlic in pots, containers or grow bags. Grow some on your patio or balcony – just follow the same premise as for planting in a garden.
Plant your garlic six inches apart in good quality soil. These long rectangular flower pots work really well for growing garlic in a smaller space.
Since garlic doesn’t grow very deep, these pots are an ideal size.
How to Grow Garlic in a Flower Bed
Garlic plants are quite pretty and look nice when they are mixed in with perennial or annual flowers. If you’ve got a few empty spaces in your flower bed, plant some sprouting garlic cloves there!
Tuck three or four alongside any of your flowers or shrubs – they take hardly any room at all and will be easy to find when it’s time for harvesting garlic bulbs.

How to Protect Garlic Cloves for Winter
It is a good idea to find a way to protect the garlic cloves for the winter months. Garlic is very hardy but if winter temperatures stay below zero, they really do need something to insulate them from the cold.
How to Mulch Garlic
Mulch the whole bed with straw once the temperatures get down around freezing. Our temperatures are cold on Fall mornings and maybe close to freezing overnight.
We do not mulch right after planting. Wait until the temperatures go down; if you mulch too early the bed could be warmer than the garlic likes it.
Sometimes here, our garlic gets planted three weeks before we go out and cover with mulch.

I loosely add about three inches of straw on top of the bed. I don’t tamp it down at all; the rain and snow that is coming will do that.
Once planted, all you have to do is weed it regularly during the growing season. One of the reasons I plant my Garlic tightly is that it reduces the weeds that come up.
So to get the Garlic in the ground and ready for Winter, it is just a matter of planting the cloves, covering them with soil, then covering them with a good layer of mulch later. You could use hay, straw, grass clippings or leaves.
During the Fall, your Garlic may start to grow and get a few inches of green leaf on them before Winter sets in. It’s OK…you don’t need to do anything to them – just wait for them to appear in Spring.

In the Spring, you may need to remove some of the mulch, especially if you see garlic trying to poke through but not being able to.
If you see any yellow foliage, this is a good sign that the garlic needs more light.
Spring Growth for Garlic
In the Spring the Garlic bulbs will continue to grow. While the green leaves are growing above the soil, the Garlic bulb is growing below the soil. Water it every few days and keep any weeds out.

In early summer (think June and early July), you will see the Garlic Scape forming and coming out from the center of the growing stalk. Every Garlic plant will send out one Scape.
As they grow, they start to curl and they look great on the dinner plate cooked whole. Can you see the Scapes?

Before you know it, you’ll have lots of green shoots to harvest – just cut them off at the base of the Scape using a knife. I usually just snap them off, it’s much faster.
If you want nice big garlic heads, you MUST take the scapes off. This directs the energy into the bulb below ground, and it will then grow bigger.
Don’t just toss those Scapes onto your compost pile. They taste great!
How to Store Fresh Garlic
For garlic storage, you’ll want to find a place where the room temperature is on the cooler side and there’s good air circulation.
If you store garlic in the refrigerator, it may start to sprout in a couple of days.
Here are several different ways to preserve garlic in oil – including how to freeze garlic.
Now you know how to plant garlic cloves in the garden – plant some this Fall!
Garlic is very easy to grow and hardly takes any room at all. Every garden should have some garlic growing in it!
Freshly dug Garlic tastes nothing like the store bought Garlic you see in the produce section at the supermarket.
You can find good healthy Garlic by buying some at your local Farmer’s Market – ask if it was grown locally.
Just remember you need 1 clove per plant, so buy accordingly. There are roughly 6 – 8 cloves on one head of garlic. You can also buy hardneck garlic bulbs here online.
More Garlic Posts
- Part 2 of the Garlic series is called “How to Make Pickled Garlic Scapes”
- Here’s how you can store garlic in olive oil – plus more ways to store garlic bulbs.
- Wondering how to roast a garlic bulb? Find out here
- This Feta Cheese Garlic Spread is a family favourite!
Want to find out which are The 5 Easiest Vegetables to Grow?
Available only to subscribers; join our Newsletter!
Published 2012, updated July 2022
[…] second installment on Growing Garlic. If you missed the first one, or want to read over it again, here it is. In the first post, I gave an overview about the process involved with growing Garlic. It’s […]